Thursday, January 26th, 2017...10:34 am
CNY x Charcuterie (Cantonese Edit)
Although you guys have only been privy to the first year this happened – this now marks the fourth year in a row that I’ve managed to make something a little seasonal and festive for the Chinese New Year. It started back in 2014 when I found out, to my horror, that plenty of my Hong Kong friends had no idea that the Singapore/Malaysia style of pineapple tarts were an entirely different beast compared to the Taiwanese pineapple cakes, which sent me down a little rabbit hole into a pineapple tart sweatshop.
Since then, I’ve managed to tackle bak kwa and sugee cookies too, but for a change this year I thought I’d try something a little closer to my adopted home.
For a quick primer on lap mei, check out this article that one of my friends, who also happens to be one of Hong Kong’s most respected food writers, wrote just over a year ago where she called it Cantonese-style Salumi.
Making my own lap cheung has been on my cooking bucket list for longer than I can remember. I actually once procured miles and miles of sausage casing (read: intestines) almost a decade ago in Singapore because I’d heard it wasn’t too difficult to do in a fridge, and I’d been gifted the sausage stuffer attachment for my KitchenAid stand mixer/meat grinder. For some reason or other I kept putting it off, and even after attending an amazing butchery workshop with Chef Tom Aikens at The Fat Pig where I got to try my hand at stuffing sausages LAST JANUARY, it still took over 11 months more before I finally dug out my own kit and got down to business.
Between a whole bunch of internet research and dropping in to grill my butchers for tips and ratios in sausage making, I ended up using this recipe as my starting point, and made a few tweaks with some suggestions from the many friends I harangued in the name of research. It’s only my first try, and I’ve got a few links left, but now that I’ve got newly emptied out charcuterie cave again – it means I don’t need to wait for the cool winter winds to get my lap cheung game on.
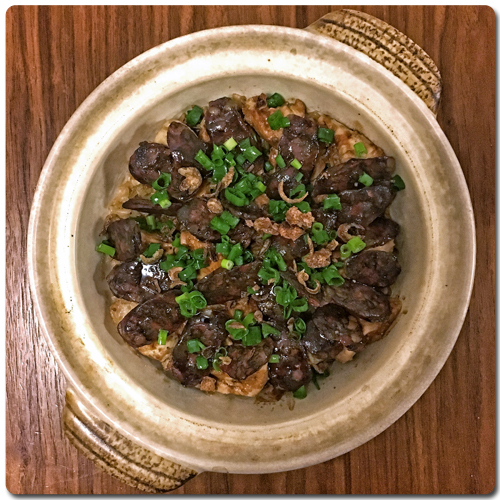
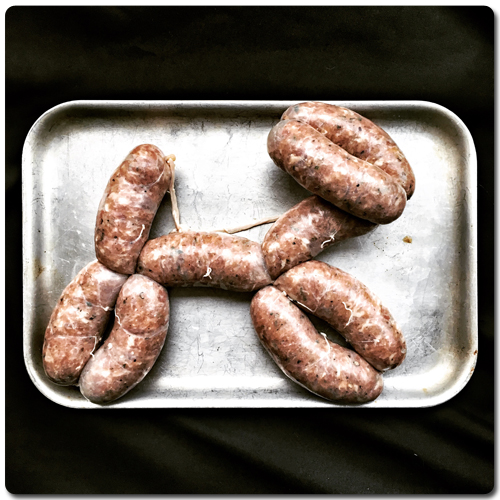
And the best part of finally getting my act together? Not only did L and I enjoy a little claypot rice mini reunion dinner with the homemade lap cheung (which was ready in the nick of time!) before she jets off to Singapore for Chinese New Year, I even had enough leftover casings to make some maple-breakfast sausages. ;)
And with that, I’d like to wish all of you an incredibly prosperous, and – perhaps more importantly – a super delicious Year of the Rooster ahead – Kung Hei Fatt Choy!
Homemade Lap Cheung
(Adapted from this recipe)
Note: While I’m almost entirely happy with how this recipe turned out (IMO the amounts of Chinese rose wine and five spice were spot on), the only change I would make is that I like my lap cheung a little sweeter. It could be because I used Thai palm sugar (lighter in colour, and generally less sweet than the Malaysian or Indonesian versions) since that was what I had on hand and I believe the original recipe was probably referring to the Indonesian variety. What would probably work even better is Chinese raw slab sugar, so while I’ve included the recipe below as I made it, do note that you might want to adjust the amount of sugar based on what type you use (if using Thai palm sugar, you can probably double it).
650g pork collar
350g pork back fat
1 small pig intestine casing, salted/soaked/cleaned
30g (3%) sea salt
1g (0.1%) pink salt/InstaCure No. 1
10g (1%) Chinese five spice powder
30g (3%) palm sugar, grated
20g (2%) soy sauce
30g (3%) Chinese rose wine (mei kuei lu jiu)
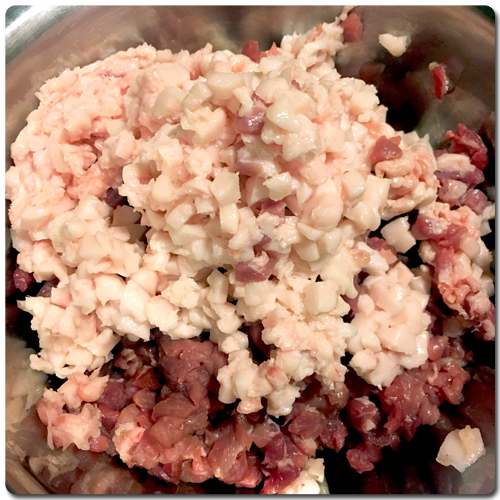
For the best texture, hand-mince the pork and back fat into 0.5cm cubes. It helps to slice the meat and fat into 0.5cm thick slices and to stick them in the freezer for about 10-15 minutes before cutting it up, and you’ll want to hone your knife every now and then to keep it razor sharp. If you’d rather get your butcher to grind it for you, I wouldn’t blame you at all. I know I sure wished I’d gone the lazy route when I was about an hour into slicing and dicing!
Combine the salt, pink salt, Chinese five spice, palm sugar, soy sauce and Chinese rose wine in a small bowl, and stir until the salt has dissolved. Add the seasoning mix to the diced meat and fat, and mix well to combine thoroughly. Press a layer of clingfilm to the surface of the meat, and chill for about 8 hours or overnight.
The next day, stuff the sausage mixture into your prepared and cleaned casings. The easiest way to do so is with a sausage stuffer, and the manual ones are much easier to control than the motorised ones (like the KitchenAid attachment). Because this mixture is relatively coarse, I actually found it easiest to use the KitchenAid attachment as a funnel, and just stuff the meat mix in with a small spatula. A regular funnel and chopstick would probably work just as well. Once the sausage mixture has been stuffed, tie off the ends of the sausage casings, distributing the meat as evenly as possible, and twist the casings off into roughly 15cm long links. Using a sterilised needle, prick the links all over to allow air to escape. (I stabbed each air bubble that I could see, and then poked them a few more times here and there for good measure.)
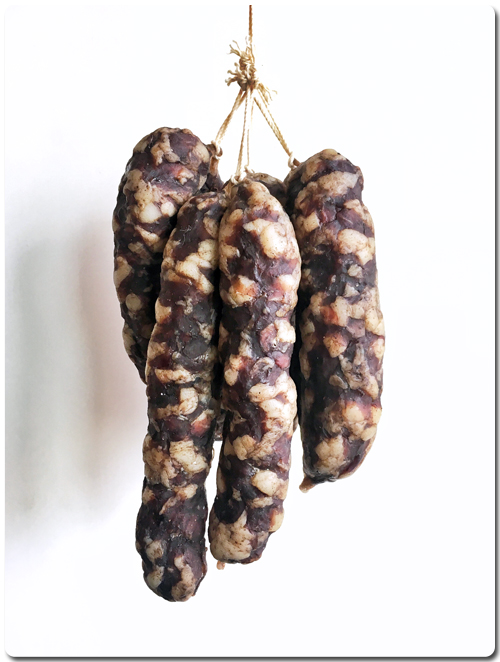
Hang the sausages in a cool, dark and well-ventilated place until they’ve lost at least 30% of their weight. Mine lost about 35% before they felt almost as firm as the storebough lap cheung that I’m familiar with, and it took just under 3 weeks, with the temperature of my curing cabinet toggling between around 8-16ºC.
They should keep, well-wrapped, in the fridge for a couple of months at least, or even longer in the freezer.
Yield: Makes about 10-12 sausages


Leave a Reply