December 27th, 2007

Season’s Greetings

Another Christmas Fixture

Hello, it’s the bunny. Since w. is so busy at work and doesn’t have energy to post here, I thought I would fill in for a bit.

It’s that time of the year again when one must reflect on the past year and make resolutions for the new one. (w made a resolution about 5 years ago never to make another resolution and that’s the only one she’s ever kept.)

This year, I will not be so stupid as to resolve to go to the gym – I now know that I will never keep that. I also will not resolve to eat less, or eat more healthily as that too will quickly fly out the window. Instead, I resolve to spend less money (should be easy now that there really aren’t any gadgets that we don’t own anymore), spend more time with my best friend who is back from the States, and ignore my relatives’ incessant nagging (especially at Chinese New Year).

Hopefully, these will be easily achievable.

A lot has happened this year which I won’t go into in detail. Needless to say, I’m glad that I have w. with me, and that we celebrated our 2nd anniversary this year. Please don’t ask us when the wedding is going to be. (w says: ask your friendly neighbourhood grassroots leader.)

So here’s wishing everybody a happy new year, and may all your wishes come true in the coming year.

PS: For those in the banking industry, you know there’ll be no bonus, so none of us can help you there.

PPS: Sorry there’s no food today. Is all expanding in my tummy. Ugh. Is so full.

December 9th, 2007

Unfortunately

Work seems to be getting the better of me. Now that I don’t even have my regular Monday off to muck about in the kitchen/treat myself to a nice dinner with the bunny, I don’t really know what there is to talk about here. I’m not leaving, and I’m not closing this down, but I thought I should let you guys know the reason why I seem to be rather quiet of late. I have a couple of drafts which are all half-written, so hopefully when I get a minute I’ll be able to finish them (and the accompanying photos) up. Till then, be good.

November 20th, 2007

Continuing The Love Affair

As I mentioned in my last post, I love eggs. Bunny’s got a colleague who’s been seconded to Singapore for the past few months, and will be leaving next month to return to a freezing cold winter and very little good (Asian) food – which he and his wife have both come to love. As such, we decided to host him (and another colleague) for dinner tonight, and I had quite a lot of fun playing around in the kitchen.


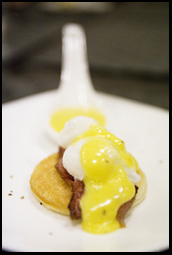
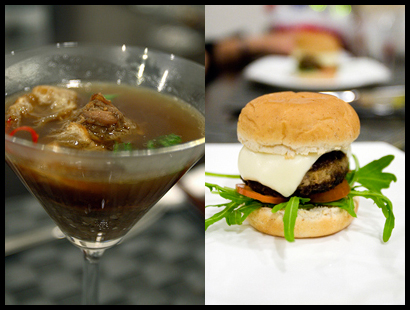
For our starters, I made the miniature eggs benedict again – this time, thankfully, remembering to include the bacon. Next up, I served my Bakkuttini (pictured below, with the burger) – a deconstructed version of bak kut teh, where I shred the meat and mix it with a reduction of the broth, pile it into a pyramid in the centre of a martini glass and serve the broth around it – which I chose because it’s my take on a very local dish, which apparently they haven’t had the chance to try (and are now dying to). S especially loved it – and by that I really mean the queen of puns was enamoured with the name, more than the dish. :P

The main course was a mini cheese burger, done the usual style with a slice of emmental melted over the top. Delightfully juicy patties, a sauce of Japanese mayo, chilli sauce, brown sauce and some worcestershire dolloped over the bun, a little rocket, thinly sliced cherry tomatoes, all encased in a mini butter roll.

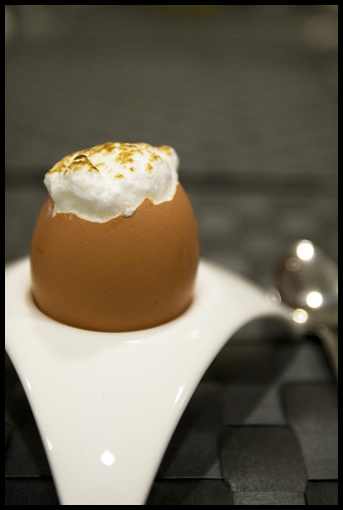
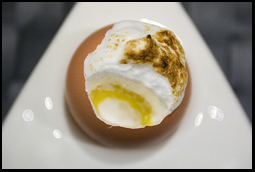
After a palate cleanser of orange sorbet came the highlight of the meal – Reconstructed Lemon Eggs (pictured at start of post). Now, I’ve been wanting to try this – and a whole bunch of other recipes – from Michel Richard’s Happy In The Kitchen. There are so many ridiculously innovative and creative ideas in there; the book completely blew my mind when I first started flipping through it. My favourite part of the book is when Richard explores the concept of trompe l’oeil, or playing tricks on the eye – that is when he has an item which looks like something, but is actually a completely different entity. For example, I can’t wait to try his Virtual Egg – something that looks exactly like half a hard-boiled egg, but really has mozzarella cheese for the “egg white” and yellow tomato for the “yolk”.


Today, I stuck with something a lot easier. The reconstructed lemon eggs are essentially a layer of lemon curd, sandwiched between two layers of meringue and served in an egg shell, so that when you dip your spoon in, it’s almost like eating a soft boiled egg. They’re really easy to make and taste divine, and I’d encourage anyone who’s entertaining soon and looking to impress (without killing yourself in the kitchen) to give it a shot.


Reconstructed Lemon Egg
(adapted from Happy In The Kitchen)

6 large eggs
1/4 cup of granulated sugar
1/4 cup freshly squeezed lemon juice (I used the juice from about 3 medium sized lemons)
25g unsalted butter, cut into cubes

Special equipment:
a cardboard egg carton
egg topper or serrated knife
disposable piping bags
blowtorch

Preheat the oven to 120°C.

Cut off the narrow end of each egg. I started out using an egg topper, but it didn’t work too well, so if you don’t have one (or don’t have one that works well), lay your egg on a towel, and saw halfway through using a serrated knife firmly but gently. Hold the egg upright, and remove and discard the tops. Empty the contents into a bowl, and separate two of the egg yolks from the egg whites, and reserve the other four whole eggs for another use. Ensure that the whites are completely free of yolk – if any of the yolks broke, use “clean” whites from the other eggs. Cover the bowl containing egg whites with clingfilm and set aside at room temperature. Place the yolks into a large heatproof bowl.

Wash out the shells, and pull the membrane out from the inside. Discard. Remove any chipped pieces from the edges of the shell, and discard. Turn the eggs upside down, place them in the egg carton, and place in the oven for a few minutes to dry out.

For the lemon curd, whisk 1/8 cup of the sugar into the yolks until pale and creamy. Add in the lemon juice, whisk, then place over a bain-marie and add the butter in one piece at a time. Carry on whisking until the curd has thickened to a thick custard (about 8 minutes), ensuring that the whisk comes into contact with the bottom of the bowl to ensure that none of the egg yolk gets overcooked. Press a piece of clingfilm down to the surface of the curd to prevent a skin from forming (but use a sharp knife to poke a couple of holes in the clingfilm so it can still “breathe”), and let cool to room temperature. Refrigerate until cold. This can be made up to 3 days in advance.

For the meringue, place the egg whites in the bowl of your KitchenAid stand mixer fitted with the whisk attachment, and whisk on high speed until very foamy and fluffy (there should not be any liquid egg white at the bottom of the bowl anymore). Slowly start adding in the other 1/8 cup of sugar, and continue to beat on high until stiff, glossy peaks form.

Fill one piping bag (or large ziplock bag) with the meringue carefully, then fill the another with the lemon curd. Cut a small opening (about 1/4 inch in diameter) in the bags to pipe, or use 1/4-1/2 inch plain tips. Stand the dry egg shells, cut side up, in the egg carton. Pipe the meringue into the egg shells, filling each one about 1/3 fill. Pipe the lemon curd onto the whites so the shells are two-thirds full. Pipe more meringue, allowing it to mound over the top, making a small dome.

Brown the tops of the meringue with a blowtorch (or if you don’t have one, preheat your broiler with the rack in the upper third of the oven and place the carton on a baking sheet and under the broiler to brown the meringue). Serve immediately in individual egg cups.

Yield: Makes 6. One each was just about right for a small dessert at the end of a 5 course meal, but you can easily double this recipe – as it was originally intended to be – and serve each person two eggs. I just got a refill.

November 10th, 2007

Eggstraordinary

I love eggs. No, seriously, I love eggs. You know how you always have one retarded friend who’d take it upon themselves to inflict misery on you by forcing you to imagine what it would be like to only have one thing in the world that you could eat for the rest of your life? When that retarded friend of mine comes along, I always say eggs. (Maybe with prawns.)


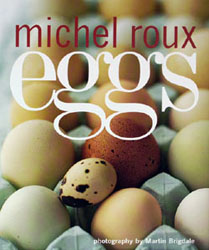
As I mentioned previously, there’s a new cookbook store in town. And the first book that I picked off the shelves was Michel Roux’s Eggs. While my interest was simply piqued thanks to the rather in-your-face cover, I was immediately sold when I flipped through and found pages and pages of beautiful recipes, all of which either primarily feature eggs, or are on dishes whose specific characteristics rely on the behaviour of eggs (in whole or in part) to provide those features. And, as if I needed any more encouraging, amazing food photography accompanies the majority of these pages.
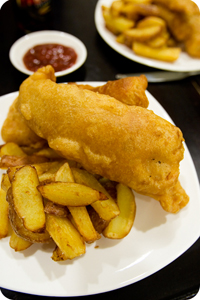

On Monday, I was due to cook for a friend’s birthday, while her girlfriend was out of town. (Babysitters.com, remember?) Unfortunately, she fell sick in the end, and hence the meal that was planned for her never really made it out the door. Or, it did, but it went straight into someone else’s mouth. Wei, lurking around after her immensely satisfying visit to 25 degree Celsius, quickly volunteered to fill in, and was hence treated to beer battered fish and chips, served with malt vinegar, tartar sauce, and some mustard Hollandaise. But I’m getting ahead of myself.

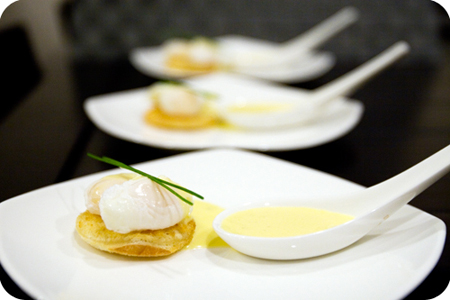
For our starters, I wanted very much to try a recipe that I saw in the abovementioned book. Its a recipe for sunny side up quails eggs, on miniature (4cm in diameter!) toast rounds and served with a light Hollandaise. However, due to some developments at work, I’m also a little obsessed with poaching eggs at the moment. Further, the bunny has been pleading with me – and making the bunny face – asking for Eggs Benedict for the longest time. Hence, I did a miniature version of Eggs Benedict, sans the bacon (which I kind of forgot about).

Mini Eggs Benedict
(inspired by a recipe from Michel Roux’s Eggs)

8 quails eggs (plus one or two extra if you’re not confident)
2 slices of plain white bread
melted butter
white vinegar
2 rashers of streaky bacon, halved crosswise.
chives to garnish
mustard Hollandaise (recipe follows)

Saw off the rounded ends of your quails eggs with a serrated knife, and place them in individual saucers. Bring a deep pot of water (at least 8-10cm deep) to the boil and add 2 tbsp of vinegar. This will help the egg whites to coagulate. When it starts to boil, gently tip one saucer at a time into the water where the bubbles are, then use a spoon to swirl the water around the egg to create a ‘whirlpool’. Let it cook for about 45 seconds over medium-low heat, and when cooked (press gently on the yolk to ascertain if it is done to your liking), remove using a slotted spoon, and transfer to an ice bath to arrest the cooking process. Repeat with the rest of the eggs.

When all the eggs are cooked, use a small knife to trim the edges. This can be done up to 2 days in advance and stored in the fridge in a bowl of cold water.

Prepare the mustard Hollandaise, and grill the bacon in the oven until crisp.

Use a 4cm pastry cutter and cut two rounds from each slice of bread. Toast the bread lightly on both sides until golden, then brush one side with the melted butter and keep warm. Heat a small saucepan of water to a simmer, then immerse all the eggs in for 10-15 seconds, just to warm through.

To serve, place one toasted round on each plate, buttered side up. Place one piece of crisped bacon on the bread, then top with two poached quails eggs. Cover half of each quails egg with some mustard Hollandaise, then serve a little extra on the side in a small spoon. Garnish with chives.

Yield: Serves 4.

Mustard Hollandaise

1 tsp white wine vinegar
1/2 tsp white peppercorns, crushed
1 egg yolk
65g clarified butter, cooled to tepid
1-2 tbsp lemon juice

20ml double cream
10g Dijon mustard
sea salt and powdered white pepper

Mix the vinegar with 1 tbsp cold water and the crushed white peppercorns in a saucepan. Reduce by one third, and leave to cool. Add egg yolk to the cold reduction, and whisk. Place your saucepan on a heat diffuser and whisk continuously until the sauce emulsifies, becoming very smooth and creamy after 8-10 minutes, with the heat gradually increasing. Do not allow the temperature to rise above 65C.

Off the heat, still whisking, drizzle the tepid clarified butter in a steady stream. Stir in the lemon juice, and pass the sauce through a muslin lined chinois to eliminate the peppercorns.

Whip the double cream in a bowl to soft peaks, then mix in the mustard until evenly blended. Whisk the mustard cream, little by little, into the Hollandaise. Season with sea salt and powdered white pepper to taste, and serve.

Note: The Hollandaise will not keep for long, so prepare it as close to serving as you can. Otherwise, keep it warm in a bain-marie (with hot water – not simmering water), with some clingfilm pressed down to the surface for an hour at most.

November 7th, 2007

Red Velvet

That is, the cupcakes. Red Velvet Cakes have rather befuddled me for quite a while now – try as I might, I can’t really seem to find a satisfactory explanation as to why one would want such unnaturally coloured food! According to wikipedia (every student’s favourite source), the red colour first came about as a reaction between the vinegar in the cake and the cocoa powder, and following the introduction of Dutch Processed cocoa powder, red food colouring has since stepped up to enable us to recreate the deep red hue, as the increase in alkalinity results in a dramatic decrease in this colourful reaction.

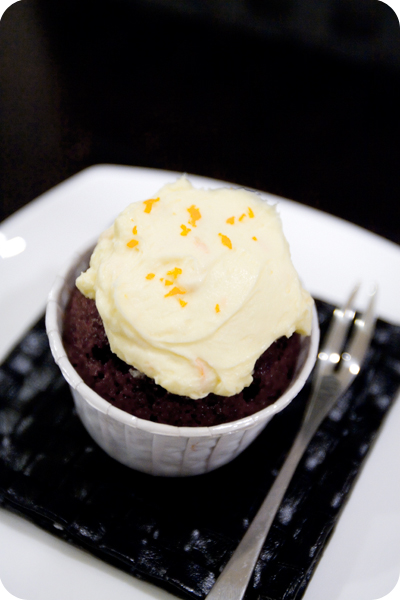
I don’t actually remember when I first heard about these peculiar cakes. But I do remember thinking that it was such a delightful sounding name – Red Velvet brings to mind the image of a deep burnished hue, and a creamy, luscious texture. Having seen a whole bunch of recipes that differ quite dramatically from each other, I approached The Chin Chai Chef and got the original NY Times recipe that hers was based on. Like her, I decided to go with the Orange-Ginger Cream Cheese Frosting (without omitting the ginger, this time), and the results proved lovely. After all, it’s difficult to fail with orange and chocolate. :)

Red Velvet Cupcakes
(Adapted from the NY Times)

3½ cups cake flour
1/2 cup unsweetened cocoa (not Dutch processed)
1½ tsp salt
2 cups canola oil
2 cups granulated sugar
3 large eggs
3 tbsp red food colouring
1½ tsp vanilla extract
1¼ cup buttermilk
2 tsp baking soda
2½ tsp white vinegar

Preheat oven to 180°C and line your cupcake tray with liners. Whisk flour, cocoa powder, and salt in a bowl. Place oil and sugar in the bowl of your KitchenAid fitted with the paddle attachment and beat at medium speed until well blended. Beat in eggs one at a time, scraping down the sides as necessary.

With the machine on the lowest speed possible, add red food colouring carefully, as it may splash. Add the vanilla, then add the flour mixture in two batches, alternating with the buttermilk. Scrape down the sides of the bowl and beat just long enough to combine.

Place baking soda in a small dish, stir in the vinegar and add to batter with machine running. Beat for 10 additional seconds.

Divide the batter amongst the cupcake liners (I filled mine just over half full – about 55-60g of batter per cupcake), then place in oven and bake for about 20-22 minutes, or until a toothpick inserted into the centre of the cupcake comes out clean. Remove the cakes from the tray and cool on a wire rack completely before frosting.

Orange-Ginger Cream Cheese Frosting
(adapted from a Martha Stewart recipe)

100g unsalted butter, at room temperature
500g cream cheese, at room temperature
100g icing sugar, sifted
finely grated zest of one medium preferably unwaxed orange
1 tsp finely grated, peeled fresh ginger
pinch of salt

In the bowl of your KitchenAid fitted with a paddle attachment, beat butter on medium-high speed until light and fluffy; about 2 minutes. Add cream cheese, beat until well combined and fluffy; another 2 minutes. Scrape down the sides of the bowl and beat for another 30 seconds. Add remaining ingredients and beat for 5 minutes. Frosting can be kept at room temperature, covered with clingfilm, for up to 2 hours.

Yield: 30 Cupcakes and enough cream cheese to frost them all!