Tuesday, January 4th, 2011...10:45 am
Banoffee Pie
As much as I pride myself on being organized (when it comes to cooking, anyway), every now and then, something beyond my control happens and springs a little surprise on me. Like a surprise birthday brunch with less than 36 hours to plan, prepare for, and execute. And, considering how most cake stores and restaurants need at least 2-3 days advance notice for a cake order, I ended up baking one.
Thankfully, one of the birthday girl’s favourite desserts is Banoffee Pie. If you’ve never made one of these, you’ll be surprised by how easy it is to assemble one of these babies. Of course, you could make life even easier for yourself and buy ready-made toffee in a jar or squeeze-bottle, but I tend to find those a little too sweet for my liking. You could probably also buy an aerosol can of whipped cream, and a pre-made biscuit or pie crust, and the only actual work you’d have to do would be to slice up some bananas and assemble the whole thing. It takes a little time to set, but you could easily whip it up the day before and ignore it till you’re ready to serve.
And although original recipe calls for a pastry base and dulce de leche made by boiling unopened tins of condensed milk, I decided to change things up a little by using a salted butter caramel sauce for the filling (I find straight-up toffee a little bit too sweet), and a biscuit base, which – according to the birthday girl’s sister – she prefers. I might try a different caramel filling next time though–this sauce was a little bit too liquid (and I was a little too greedy whilst filling the pie shell), so things got a little messy when it started to overflow.
My Banoffee Pie
For the base:
350g digestive biscuits
100g unsalted butter, melted
For the salted caramel sauce:
85g butter
150g sugar
250g cream
1 tsp fleur de sel
1 tbsp vanilla extract
For the pie:
4-5 ripe bananas
300g whipping cream
2 tbsp icing sugar
1 vanilla bean, split and scraped
30g unsweetened dark chocolate/cocoa powder/chocolate shavings
Preheat your oven to 180ºC. Crush all the digestive biscuits finely – my favourite method is to place them all in a ziploc bag and whack the back with a rolling pin – and melt the butter in your microwave (it should take about 30-60 seconds). Combine the butter and biscuits crumbs, then press the mixture into a 9″ tart pan (preferably one with a removable base). You want to ensure that the base is quite firmly packed in, and also evenly brought up the sides. Bake the base for about 8-10 minutes. Remove, and allow to cool completely.
Next, make the sauce. Melt the butter in a heavy-based saucepan, then add in all the sugar. Cook, stirring constantly with a whisk, until the sugar turns a deep brown and just starts to smoke. Remove from the heat and pour in half the cream. Be very careful, as the mixture will smoke, bubble and spit quite furiously. (You may want to wear an oven mitt to protect your hands.) Once the cream has been fully incorporated, whisk in the vanilla and salt, then gently whisk in the rest of the cream. Cool in an ice-water bath, then refrigerate until very cold.
To assemble, peel and slice the bananas into 3mm thick slices on an angle. Whip the cream with the icing sugar and the scraped seeds from your vanilla bean (reserve the pod for another use) to soft peaks. Pour most of your caramel sauce into the shell, you should have a layer of sauce about 5mm deep. Fan the banana slices out, overlapping the slices slightly. You don’t need to be too fussed about how it looks, as it’s going to be covered anyway, but just ensure that you’ve got a fairly even layer. Depending on the depth of your pie shell, you can also drizzle a little more caramel sauce over at this point. The key is to leave about 2-3mm of depth before you pile on the whipped cream. Finally, dollop on the whipped cream. I like to leave a little space around the edge so you can see what’s inside the pie.
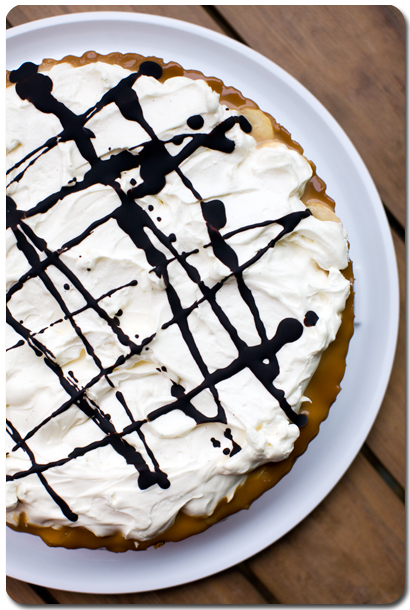
The easiest ways to decorate this pie would be to dust the pie with cocoa powder, or just scatter dark chocolate shavings over the pie, but I loved the contrast of the chocolate sauce against the white cream. Melt some chocolate in a microwave (again, do this in a couple of 30-second bursts), then stir to melt the last couple of solid bits and cool it slightly. Once the sauce starts to thicken a little, drizzle it sparingly across the pie, in whatever pattern you’d like. Allow the entire pie to chill in the fridge for at least 2 hours to set, then serve with any leftover caramel sauce.
The pie will keep, refrigerated, for probably 2-3 days. (But they’ve never lasted that long in my house before!)
Yield: Serves 10-12


1 Comment
January 4th, 2011 at 2:05 pm
Jackson Pollock would be proud. :D