Saturday, January 2nd, 2010...6:57 pm
NYE à la Momofuku
Happy 2010, everyone! Things have been a little busy in the ‘Kong, what with our NYC trip (which I will try to write about soon!), and back-to-back visitors over December. New Year’s Eve was a fairly tame affair in this household, with just four of us (the last houseguest of the decade, J, and S joined us in this year’s feasting), a delicious spread, and a healthy dose of booze.
To bunny’s dismay, J has been the first person around to not just entertain but encourage my crazy kitchen ideas, and while I was showing him one of newest cookbook acquisitions, we decided that NYE’s dinner needed to pay tribute to some of the yummiest food I partook of in the big apple. Having regaled him with tales of the Momofuku Pork Bun, that naturally was on the menu. When we flipped through and found the fried chicken recipe, things just started to fall into place.
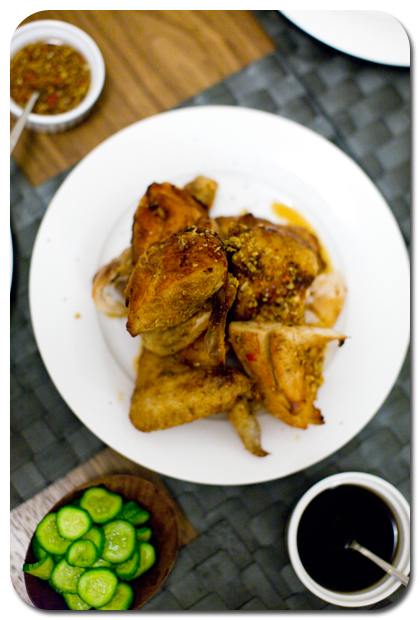
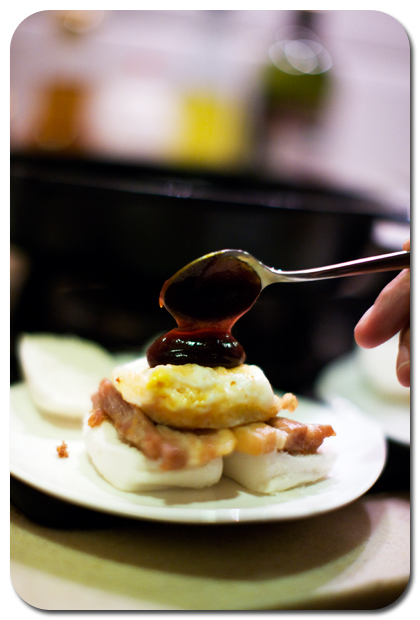
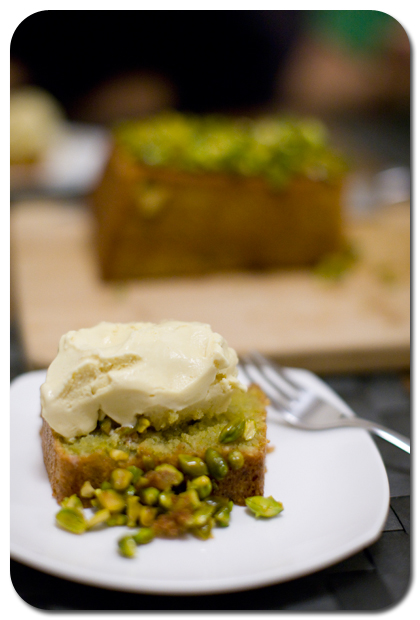
And dinner was thoroughly badass. A fittingly epic last meal of the decade, starting with my take on the pork & egg buns, followed by David Chang’s fried chicken (which he brines, then steams, then fries, delivering a shatteringly crisp skin), and ending off with the River Cottage pistachio cake topped with a batch of cereal milk (based on Christina Tosi’s cereal milk panna cotta) frozen custard.

It’s now two days later and I’m still reeling from the deliciousness of the meal – something I couldn’t have carried off at such short notice without my trusty sous chef! (He also took most of the photos here – and you can see the rest of his shots – plenty of which involve the three monsters who have been haranguing him nonstop – on his flickr stream.) I’m also more than relieved that I don’t need to wait till my next visit to Manhattan before I get to sample more of David Chang’s awesome Momofuku creations!
Now, how did everyone else count down?
Pork & Egg Buns
(inspired by and based largely on recipes from David Chang’s Momofuku cookbook)
8 slices pork belly (see below)
4 slow-poached eggs (see below)
4 or 8 frozen chinese buns (the white sweet-ish sort, I substituted man tou ‘cos I couldn’t find the proper ones, but it worked fine)
quick-pickled cucumbers (see below)
4 tsp hoisin sauce
rendered pork fat or oil for deep frying, heated to 190C
Steam the buns according to the instructions on the packet (generally about 5-8 minutes on medium-high heat), and halve them if necessary. While the buns are steaming, deep fry the pork belly slices just so they’re heated through and the edges are golden brown and starting to get crispy. Crack the eggs out of their shells and slide them into the hot oil, deep-frying until golden brown all over and just heated through.
Assemble the buns from bottom-up as follows: bun, pork belly, egg, 1 tsp hoisin, 4-5 slices of the pickled cukes, then the top bun. Serve immediately, with chilli sauce and scallions on the side.
Pork Belly
5-600g slab of pork belly, with the cross section measuring roughly 2×4″
1 tbsp sea salt
1 tbsp caster sugar
50g rendered pork, beef, goose, or duck fat
Mix the salt and sugar together, then rub it all over the pork belly in a ziploc bag, then seal and refrigerate for 4-8 hours. Rinse, discarding any liquid that has collected in the bag, then transfer to a new, clean ziploc bag. Warm the rendered fat until liquid and pour it into the bag over the belly. Seal the bag, pressing out as much air as you can.
Heat a pot of water to between 80-85C. Using a flame-retarder, or any other method you prefer – if you’re a lucky bastard and already own a sous vide supreme, you should clearly use that (heated to 82C, specifically – maintain the temperature of the water in that range and confit the pork belly, en sous vide for 8 hours. Once the cooking is complete, plunge the bag into an ice bath to stop the cooking process, then refrigerate until completely cold (this makes it easier to slice). You can prepare the pork up to a week in advance until this step.
Before serving, run warm tap water over the bag to slightly loosen the fat, then remove the pork belly from the bag, scraping off the excess fat. Cut into slices roughly 0.5cm thick. The slices can then be warmed in a little oil in a skillet, deep fried, or grilled.
Slow-Poached Eggs
This is basically David Chang’s take on the ubiquitous onsen tamago – i.e. eggs that Japanese women used to make by carrying a basket of raw eggs into then onsen or hot spring baths with them while they bathed. In the time it took for a good soak, you’d emerge not just refreshed, but with a basket of creamy eggs, coddled in their shells.
There isn’t so much a recipe for this, it’s just a method. Essentially, the raw eggs – shells intact – need to bathe for about 45 minutes at 62C. Again, unless you have an immersion circulator, it’s a little hard to keep your water at Precisely this temperature, so if you keep it within maybe 60-63C, you should be good to go. Once I got a large-ish pot of water to 62C, I popped the eggs (previously brought to room temperature) in, and just turned the heat back on to medium-low for about 30 seconds every 7-8 minutes. Obviously, if you have a bigger pot of water, it’s going to maintain its temperature better, especially immediately after adding the eggs in.
Once the eggs are cooked, you can use them immediately, or chill them in an ice bath to arrest the cooking, and refrigerate until you reheat for use up to 2 days later. When you crack them open, there will be a little bit of egg white that’s still fairly loose, just crack your egg onto a saucer, and tip the dish over your sink, using your fingers to hold the egg in. It will drain off the loosest, translucent bits, and the rest are fine for eating.
Quick-Pickled Cucumbers
Another non-recipe: slice two to three small cucumbers into 1/8-inch-thick discs, and toss with 1 tsp each coarse salt and caster sugar. Set aside for 5 minutes, then rinse and drain. Taste them: if you like how they are (slightly crunchy, with a little saltiness and a hum of sweetness in the background), you’re good to go. Otherwise, correct the seasoning with extra salt or sugar, and drain again before using. It takes literally 8 minutes to do from start to finish, and the cukes can be held for a couple of hours max, so do this right at the end, just before you start your steaming and deep-frying!
Yield: Serves 4 as a first course, or 1 really hungry person. :)


5 Comments
January 4th, 2010 at 3:32 pm
happy New Year, xpy!
January 4th, 2010 at 9:10 pm
[…] was sous chef and helped with the pics so go see whine & dine for the full break […]
January 23rd, 2010 at 2:32 pm
Hey! You don’t know me but I’ve been a long-time lurker on your blog. I love your posts on recipes! I wish I could cook them on a regular basis but I am barred from my kitchen :(
As a student going on exchange for a semester and desperately in need of quick and easy recipes, do you have any sites or books to recommend? Thank you!
January 24th, 2010 at 11:54 am
Z: Hey, why are you barred from your kitchen?! That’s awful. :(
I know a lot of people diss him, but I’m actually a huge fan of Jamie Oliver’s cookbooks. They target people who don’t really know how to cook/just want simple, fuss-free meals on the table in a minimum amount of time without compromising on the quality of ingredients, so I’d point you in that direction. :) My favourite from his series of cookbooks is actually Cook with Jamie, ‘cos it teaches you cooking techniques as well as a bunch of recipes, so it’s the kind of cookbook that helps you grow, I feel. The other two I really like are Happy Days with the Naked Chef and Jamie’s Dinners.
Alternatively, you could also look through the Fuss Free posts on my blog :D
January 28th, 2010 at 5:50 am
Thank you for the suggestion! :)
Yeah, my mum refuses to let me mess with the kitchen. One baking incident kind of set her off thus, I’ve been off-limits to it.
Onwards to cooking!